
To remove minor car paint scratches at home, start by evaluating the damage to see if it’s a surface scuff or a deeper gouge. Then, clean the area thoroughly with microfiber cloths and gentle soap to guarantee proper paint adhesion. Apply touch-up paint carefully, using thin layers and blending well. Finish by polishing the area smoothly and protecting it with wax. If you want to learn more tips, keep exploring for a professional-looking repair.
Key Takeaways
- Clean the scratched area thoroughly with water and microfiber cloth to remove dirt and ensure proper paint adhesion.
- Lightly sand the scratch with fine-grit sandpaper to smooth edges and prepare the surface for touch-up paint.
- Match the paint color using your vehicle’s paint code and apply thin, even layers of touch-up paint, allowing each to dry fully.
- Use a rubbing compound in circular motions to blend and smooth the repaired area for a seamless finish.
- Finish with polishing, buffing, and applying a protective wax or sealant to enhance shine and protect the repair.
Assessing the Damage and Gathering Supplies
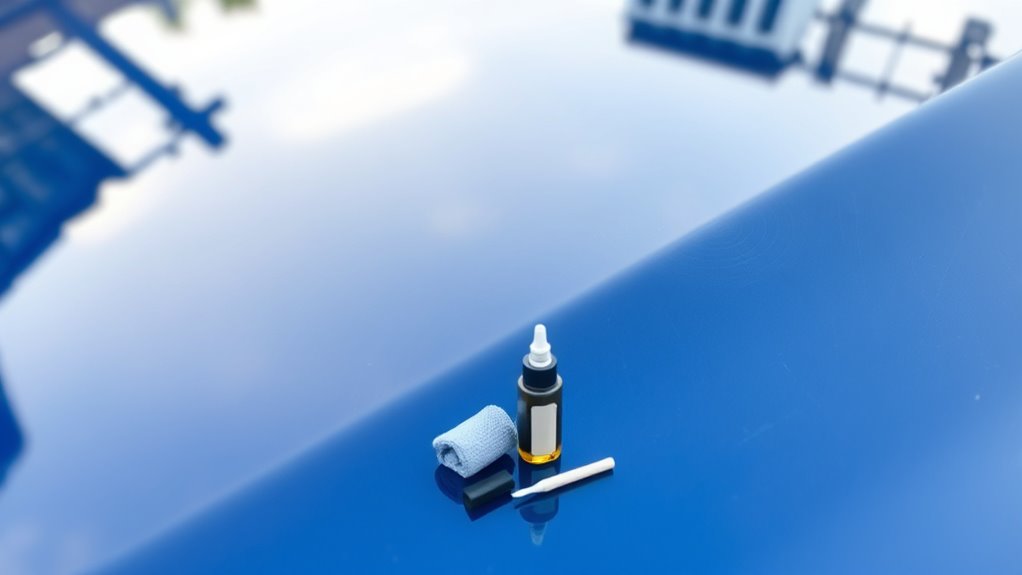
Before you begin repairing a scratch, it’s important to carefully assess the damage and gather the right supplies. Start with damage assessment to determine the depth and extent of the scratch. Is it a surface-level scuff or a deeper gouge? This will influence your repair approach. Once you’ve evaluated the damage, focus on paint matching to ensure the color blends seamlessly. Gather supplies like touch-up paint that closely matches your car’s color, a small applicator brush, and polishing cloths. Accurate paint matching minimizes visible repairs, so check the paint code on your vehicle and test the color on a hidden area first. Proper damage assessment and the right supplies set the foundation for a successful, professional-looking repair. Additionally, understanding the paint matching process and selecting the appropriate tools can significantly improve the final result. To achieve a seamless repair, learning about color blending techniques can also be highly beneficial. A thorough understanding of repair techniques can help you restore your car’s appearance more effectively. Developing skills in these paint correction methods can further enhance your ability to achieve a flawless finish. Mastering the use of aroma oil diffusers and related products can also create a calming environment during your repair process, making the task more enjoyable.
Cleaning the Scratched Area Thoroughly

Cleaning the scratched area thoroughly guarantees that no dirt, dust, or debris interfere with the repair process. Start by using handheld scrubbers to gently remove loose dirt and grime from the scratch and surrounding surface. These tools help loosen stubborn particles without scratching the paint further. After scrubbing, dip a microfiber cloth in clean water and carefully wipe the area to eliminate residual dirt and contaminants. Make sure to dry the surface completely with a dry microfiber cloth, as moisture can interfere with adhesion later. Proper cleaning assures your repair materials will bond correctly and look seamless. Take your time to be thorough, focusing on the scratch itself and the surrounding area, so you create a clean, smooth surface ready for touch-up or polishing. Ensuring your car’s surface is free of contaminants is essential for optimal paint adhesion and a flawless finish. Additionally, using a cleaning method that removes all residues will help prevent future issues with peeling or uneven coloring. Incorporating techniques such as surface preparation can further enhance the effectiveness of your repair process. According to the air purifier maintenance guidelines, maintaining a clean surface is also crucial for effective air filtration in your environment. Proper cleaning not only improves the appearance but also prevents corrosion or further paint damage over time.
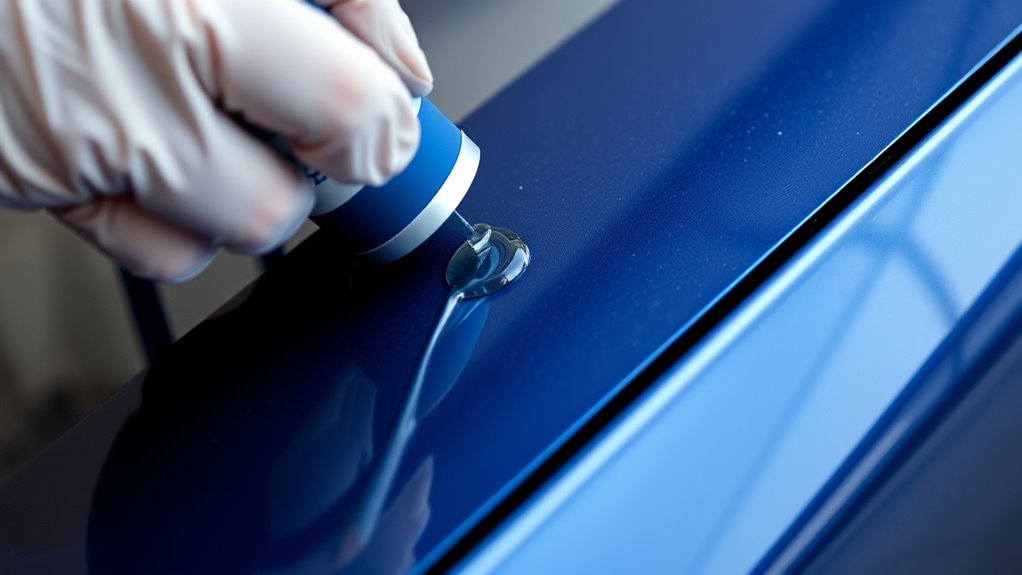
Applying Touch-Up Paint for Deep Scratches

When applying touch-up paint for deep scratches, it’s vital to select the correct color match to guarantee a seamless blend. Before you start, make certain the surface is properly prepared and free of debris for the best results. As you apply the paint, do so carefully to avoid uneven coverage or drips. Paying attention to color matching can significantly enhance the overall repair quality.
Selecting Correct Color Match
Choosing the right color match is crucial to guarantee your touch-up paint blends seamlessly with your vehicle’s existing finish. To achieve this, start by examining your car’s paint code, usually found on the driver’s door jamb or under the hood. Use that code to select a precise match from your supplier or auto parts store. When doing color matching, compare the new paint to your car in natural light, as indoor lighting can distort the shade. Mix small amounts first to test how well the paint blends with the existing finish. Proper paint blending minimizes visible edges and ensures a smooth transition. Remember, even slight differences in color can be noticeable, so patience in selecting the perfect match is key to a professional-looking repair. Additionally, understanding zodiac traits and personalities can help you develop a keen eye for subtle color differences, ensuring your repair looks flawless.
Preparing the Surface Properly
After selecting the correct color match, it’s important to prepare the surface thoroughly before applying touch-up paint to deep scratches. Proper surface preparation ensures the paint adheres well and looks seamless. First, clean the area with soap and water, then dry it completely. Next, gently sand the scratch with fine-grit sandpaper to smooth edges and remove loose paint. After sanding, wipe the area with a tack cloth to eliminate dust. Finally, apply a thin layer of primer to the prepared surface to enhance paint adhesion and prevent rust. This primer application creates a smooth base for the touch-up paint, helping to blend the repair seamlessly with the rest of the car’s finish. surface preparation is a crucial step in achieving a durable, professional-looking repair. Additionally, ensuring the proper curing time allows the paint to set correctly and resist future damage.
Applying Touch-Up Paint Carefully
To achieve a seamless repair, apply the touch-up paint carefully in thin, even layers. Start by matching the paint color precisely to your car’s original hue—this guarantees proper color matching and reduces noticeable differences. Use a fine brush or applicator to gently dab the paint into the scratch, avoiding excess. Allow each layer to dry completely before adding the next; this helps with paint blending and creates a smooth finish. Take your time to build up the color gradually, rather than trying to cover everything in one coat. If needed, lightly sand between layers for a perfect blend. Proper application ensures the touch-up paint integrates seamlessly with the surrounding paint, restoring your car’s appearance without obvious signs of repair. Additionally, understanding paint matching techniques can further improve the overall effectiveness of your touch-up process.
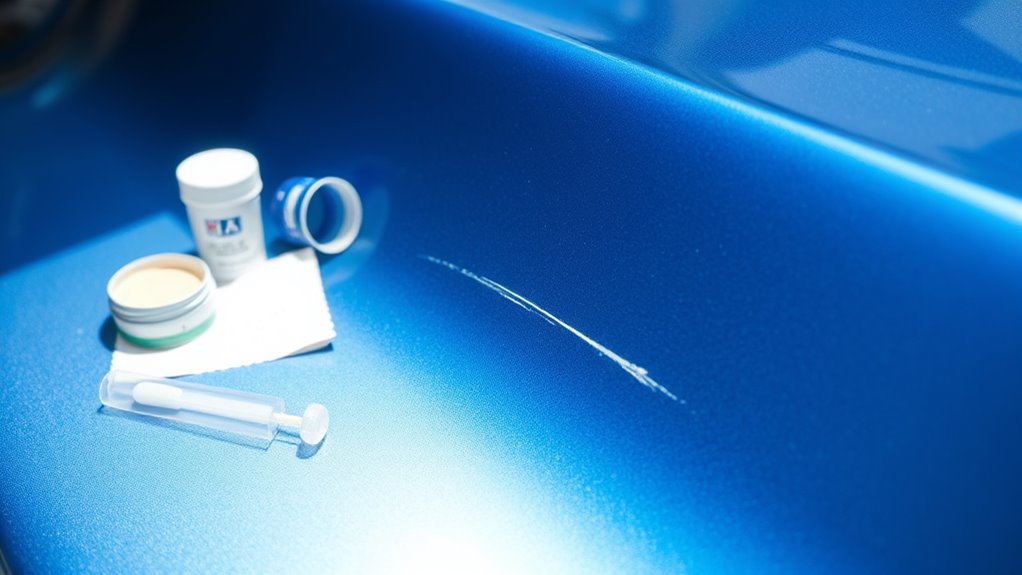
Using Rubbing Compound to Smooth Out Surface Scratches
When dealing with surface scratches, rubbing compound can be a highly effective tool for smoothing out imperfections. It works by gently removing a thin layer of clear coat, revealing a smoother surface. To use it effectively, follow these steps:
- Apply a small amount of rubbing compound to a clean, soft cloth.
- Rub the compound onto the surface scratches in circular motions with moderate pressure.
- Continue until the scratches begin to fade and the surface feels smoother.
- Wipe away any excess compound with a clean cloth and inspect your work.
This process helps blend minor surface scratches into the surrounding paint, restoring a more uniform appearance. Remember, using rubbing compound carefully prevents further damage and prepares the area for polishing.
Polishing and Buffing for a Seamless Finish
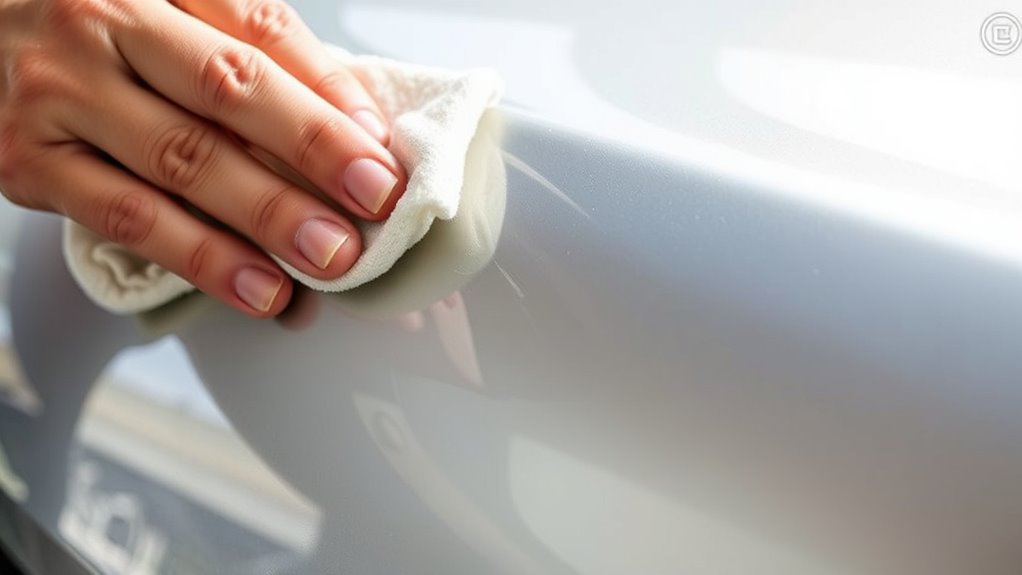
To achieve a flawless finish, you need to apply proper polishing techniques that smooth out the surface. Buffing with the right tools and materials will bring back your item’s shine and clarity. Focus on consistent motion and gentle pressure to make certain of a seamless, professional look. Proper technique is essential for preventing further damage and ensuring a smooth, even surface. Incorporating smart polishing tools can enhance precision and reduce the risk of uneven buffing. Additionally, understanding visual and auditory cues can help you better assess the quality of your polishing process for optimal results. Using the correct polishing compounds can also significantly improve your results and protect the underlying paint. Being aware of home-maintenance tips can further support your efforts in maintaining a pristine finish and prolonging the lifespan of your repair.
Proper Polishing Techniques
Achieving a flawless finish requires careful polishing and buffing techniques that smooth out the repaired area seamlessly. To do this effectively, focus on proper polishing techniques and buffing methods that avoid streaks or haze. First, choose the right polishing compound for your car’s paint. Second, use a soft microfiber cloth or foam applicator in gentle, circular motions. Third, keep the surface cool by working in a shaded area and avoiding excessive pressure. Fourth, regularly check your progress, and wipe away residue to see if the finish matches the surrounding paint. Proper polishing techniques involve patience and attention to detail, while the right buffing methods ensure a smooth, high-gloss result without damaging the clear coat.
Buffing for Shine
Once you’ve completed the polishing process, buffing for shine brings out a smooth, mirror-like finish. To achieve this, use proper polishing techniques combined with the right buffing tools. Start by selecting a soft, clean microfiber or foam buffing pad to prevent scratches. Apply a small amount of car polish or buffing compound to the pad, then gently work it over the repaired area in overlapping circles. Maintain consistent pressure and speed to ensure an even, seamless look. As the surface begins to shine, gradually reduce pressure to avoid over-polishing. Once you’re satisfied with the gloss, wipe the area with a clean microfiber cloth to remove any residue. Proper buffing techniques and tools help seamlessly blend the repair, restoring your car’s smooth, glossy finish.
Protecting the Repair With Wax or Sealant
After you’ve successfully repaired the scratch, applying a protective layer is essential to keep the repair intact and shield it from future damage. Using car wax or paint sealant creates a barrier that guards against UV rays, dirt, and minor abrasions. To do this effectively, follow these steps:
- Choose a high-quality car wax or paint sealant suited for your car’s finish.
- Apply a small amount evenly over the repaired area using a soft cloth or applicator pad.
- Let it haze or cure as directed on the product label.
- Buff gently with a clean, microfiber cloth to achieve a smooth, glossy finish.
- Remember that protective coatings are a critical part of maintaining your car’s appearance and longevity. Applying these coatings regularly helps preserve your vintage-inspired aesthetic while ensuring your vehicle remains protected from environmental damage. This extra layer helps preserve your repair, maintains shine, and extends the life of your work. Incorporating proper maintenance practices with the right natural materials can additionally enhance the durability of your repair and keep your vehicle looking its best over time. Regularly inspecting and reapplying protective layers ensures long-term paint protection and keeps your car looking its best.
Preventive Tips to Minimize Future Scratches

To minimize future scratches on your car, start by parking in safe, low-traffic areas away from potential hazards like shopping carts and narrow spaces. Good parking habits are essential; always choose spots with enough room to avoid brushing against walls or other vehicles. Applying paint protection, such as quality wax or sealant, creates a barrier that helps prevent minor scratches and keeps your car’s surface smooth. Regularly cleaning your vehicle reduces dirt and debris that could cause scratches when you wipe or wash. Be mindful of your surroundings and avoid parking near trees or bushes that might scratch the surface. Additionally, proper maintenance techniques can further extend the longevity of your vehicle’s paint and minimize the risk of scratches. By practicing smart parking habits and maintaining proper paint protection, you markedly reduce the chances of future scratches and keep your car looking pristine.
When to Seek Professional Help
Knowing when to seek professional help is essential for effectively repairing scratches that go beyond minor surface marks. If you notice any of the following, a professional assessment is recommended:
- The scratch is deep enough to feel with your fingernail, indicating severe damage.
- The paint is chipped or has exposed metal, risking rust formation.
- Multiple scratches cluster together, suggesting a larger area of damage.
- The damage extends to areas hard to access or repair yourself, like near the edges or curves.
Attempting DIY repairs on severe damage can worsen the problem or cause uneven results. When these signs appear, consulting a professional ensures proper restoration and prevents further harm to your vehicle’s paint.
Frequently Asked Questions
Can I Repair Scratches on All Car Paint Colors at Home?
Yes, you can repair scratches on most car paint colors at home, but success depends on matching the paint color and type. You’ll need to take into account the specific paint type and carefully choose a matching touch-up product. For best results, test on a small area first, and ensure proper color matching to blend seamlessly. Keep in mind that some colors and finishes may require professional help for perfect repair.
How Long Does a DIY Scratch Repair Typically Last?
Your DIY scratch repair typically lasts between a few months to a couple of years, depending on factors like paint longevity and repair durability. To extend its lifespan, avoid harsh weather, frequent washing, and abrasive cleaners. Proper application and using quality materials can also improve the longevity of your repair. Keep in mind that minor scratches may need touch-ups over time, but with good care, your fix should stay looking good longer.
Are There Risks of Damaging the Clear Coat During Repair?
Did you know that improper DIY scratch repair can cause clear coat risks in over 60% of cases? You might damage the paint layer if you use abrasive materials or apply too much pressure. To avoid this, work gently and follow proper techniques. This way, you protect the clear coat and prevent further damage, ensuring your repair lasts longer without risking paint layer damage.
What Household Items Can Temporarily Hide Scratches?
You can use household remedies as temporary solutions to hide scratches. Apply a small amount of toothpaste, which acts as a mild abrasive to buff out minor marks, or use a bit of clear nail polish to fill in shallow scratches temporarily. Rubbing a car wax or even a bit of petroleum jelly can also help mask the scratches for a short time. Just remember, these are only temporary fixes.
How Do I Match Touch-Up Paint to My Car’s Color Exactly?
To match your car’s color exactly, start by checking your car’s paint code, usually found on the driver’s side door jamb or under the hood. Use this code to buy the correct touch-up paint. When applying, follow proper touch-up techniques like applying thin, even coats and blending the edges. Test the paint on a hidden area first to verify perfect color matching before tackling the visible scratch.
Conclusion
By handling minor scratches at home, you can save both time and money—studies show DIY repairs can cut costs by up to 50%. Regular maintenance and quick fixes prevent small issues from turning into costly repairs later. Keep your car looking great and protected with simple steps, and remember, addressing scratches early can extend your vehicle’s lifespan and value. With a little effort, you can keep your car’s finish sleek and flawless for years to come.