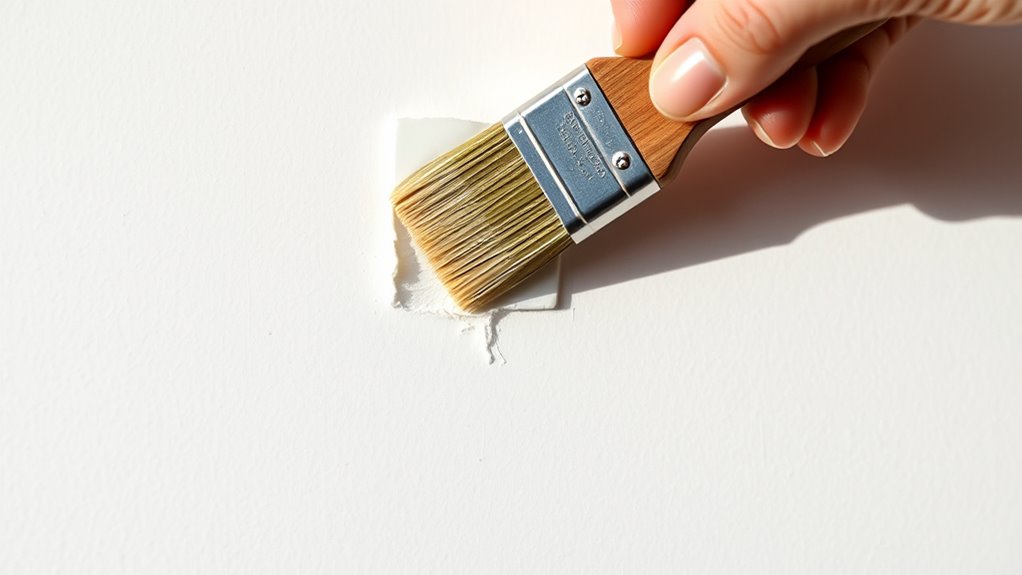

To touch up small chips and dings, gather matching paint, a small putty knife, fine sandpaper, and a brush. Clean the chipped area thoroughly, lightly sand rough edges, and carefully apply paint using a fine brush or foam applicator. Build up thin layers if needed and allow each layer to dry completely. For a seamless finish, inspect and lightly sand any uneven spots. Keep going to learn how to make your repair nearly invisible.
Key Takeaways
- Clean the chipped area thoroughly and lightly sand to ensure smooth adhesion.
- Match the paint precisely using color-matching services or apps for seamless blending.
- Use a fine brush or foam applicator to carefully dab paint into the chip, building up layers if needed.
- Allow each coat to dry fully, then lightly sand and touch up for a smooth, invisible repair.
- Ensure proper ventilation and avoid enlarging the chip during preparation for best results.

Paint chips can be unsightly, but fixing them doesn’t have to be complicated or expensive. With a little patience and the right supplies, you can restore your walls to look fresh and seamless. The key to a successful repair is focusing on paint matching, which guarantees that your touch-up blends perfectly with the existing wall color. Before you start, gather your repair tools—these typically include a small putty knife, fine-grit sandpaper, a paintbrush or foam applicator, and, most importantly, a matching paint color. Many hardware stores offer matching services or color-matching apps that help you find the exact shade you need, making your repair less noticeable.
Once you have your paint matched, start by cleaning the chipped area thoroughly. Use a damp cloth to remove dust, dirt, or loose paint. If the chip is deep or rough, gently sand the edges with fine-grit sandpaper to smooth out the surface and create a better bond for the repair paint. Be careful not to widen the chip; your goal is to prepare the area for a seamless blend, not to enlarge it. Applying a primer isn’t always necessary, but if the area is large or if the paint has a different sheen or texture, a primer can help the touch-up blend more naturally.
Additionally, understanding proper ventilation can help ensure a safe and comfortable repair process, especially when working with paints and primers that emit fumes. Next, use your repair tools to carefully fill the chip. If you’re working with a small chip, a fine detail brush or foam applicator gives you more control. Dip your brush into the matched paint, and gently dab it into the damaged area. Avoid over-applying; you want to fill the chip flush with the wall surface without creating a noticeable bump. If the paint shrinks as it dries, you may need to add a second coat once the first is dry. Take your time to build up thin layers rather than trying to do it all at once.
After the paint has dried, inspect the repair. If needed, lightly sand any uneven edges and touch up with a little more paint for a smooth finish. The goal is for the repaired spot to blend seamlessly with the surrounding wall, making the chip virtually invisible. With patience and careful application, you can repair small chips yourself and keep your walls looking pristine without breaking the bank. Remember, your attention to detail, especially in paint matching and using the right repair tools, makes all the difference in achieving a professional-looking result.

Black Touch Up Paint for Cars, Color Accurate Car Touch Up Paint, Professional Automotive Scratch Repair, Lasting Auto Scratch Remover, Quick Dry, Easy to Use, Safe and Waterproof, Versatile Use
Effective Car Scratch Remover – Our black touch up paint for cars, made with premium materials and advanced…
As an affiliate, we earn on qualifying purchases.
As an affiliate, we earn on qualifying purchases.
Frequently Asked Questions
Can I Use Household Paint for Touch-Ups?
You can use household paint for touch-ups, but it’s not ideal. Household paint often has an inconsistent paint consistency and may not match your wall color perfectly. To get a seamless repair, you should try to match the paint color as closely as possible and guarantee the paint consistency is smooth. Using specialized touch-up paint or mixing small amounts of your original paint helps achieve better color matching and a clean finish.
How Long Should Paint Dry Before Washing the Car?
You should wait at least 24 to 48 hours for the paint to dry before washing your car. This drying time guarantees the paint fully cures and adheres properly. Rushing into a wash too soon can cause the paint to peel or smudge. To avoid any washing delay issues, give it ample time, especially if the weather is humid or cool, which can extend the drying process.
Will Touch-Up Paint Match Exactly Every Time?
While perfect paint color matching isn’t always guaranteed, you can considerably improve touch-up accuracy with careful preparation. Expect some slight variation, especially if your car’s paint has faded over time or if the original color was custom-mixed. To minimize discrepancies, use high-quality touch-up paint, apply thin layers, and blend carefully. Keep in mind, a skilled touch-up job can make imperfections less noticeable, restoring your vehicle’s sleek look.
Is It Better to Repair Chips Indoors or Outdoors?
You should repair chips indoors to avoid weather considerations that can affect paint drying and adhesion. Indoor repairs give you controlled conditions, ensuring better paint compatibility and a smoother finish. Outdoors, humidity, rain, or extreme temperatures can cause issues like uneven drying or paint failure. So, for the best results, choose a dry, moderate day indoors, especially if you want a seamless touch-up that lasts.
How Do I Prevent New Chips From Forming?
You can prevent new chips by applying a protective clear coat to boost paint prevention and enhance chip resistance. Avoid harsh impacts and abrasive cleaning tools, and try to keep your walls free from frequent contact or banging. Regularly inspect painted surfaces and touch up small chips promptly to prevent them from spreading. Using high-quality paint and proper application techniques also increases durability, helping your walls stay chip-resistant longer.

COLOR MUSE Colorimeter – Mobile Color Matching Tool – Instantly identify closest matching paint colors, products, and digital color values
SIMPLE AND PORTABLE – Scan any flat surface to find the closest matching paint colours and products in…
As an affiliate, we earn on qualifying purchases.
As an affiliate, we earn on qualifying purchases.
Conclusion
Now, as you step back and admire your work, it’s almost funny how a tiny chip can lead you to discover just how satisfying DIY repairs can be. Maybe it’s the surprise of how easily you fixed it or the fact that you’ve saved yourself a trip to the paint store. Either way, those small touch-ups not only protect your car but also remind you that sometimes, the simplest fixes bring the biggest sense of accomplishment.

12 Pcs Paint Brush 5 Inch Trim Painting Tool Soft Bristle with Wood Handle Small Paint Brushes for Walls, Touch Up, Cabinets, Fences, Edge Painting Tool
Package Content: You will receive 12 pieces of paint brush, enough quantity meets all your needs.
As an affiliate, we earn on qualifying purchases.
As an affiliate, we earn on qualifying purchases.

3M Drywall Sanding Sponge, Fine/Medium Grits, Dual Grit Block, Medium Grit to Remove, Fine Grit to Smooth, Ideal for Sanding and Smoothing of Joint Compounds, 2-5/8 in x 3-3/4 in (9095DC-NA)
IDEAL FOR MODERATE SANDING AND SMOOTHING of joint compounds
As an affiliate, we earn on qualifying purchases.
As an affiliate, we earn on qualifying purchases.