To avoid trapped bubbles when applying car decals or racing stripes, start with thorough surface cleaning using isopropyl alcohol to guarantee smooth adhesion. Use painter’s tape to align your decal and peel back the backing gradually, pressing it onto the surface from the center outward with a squeegee or plastic card. If bubbles form, puncture them with a pin and press out the air. Following these steps leads to a professional, bubble-free finish—you’ll learn more if you continue.
Key Takeaways
- Prepare the surface thoroughly with cleaning and isopropyl alcohol for optimal adhesion.
- Use painter’s tape to precisely position the decal before peeling back the backing.
- Work slowly, pressing from the center outward to ensure smooth application and reduce bubbles.
- Puncture any trapped bubbles with a pin and press them out with a squeegee promptly.
- Apply consistent pressure with a soft tool to maintain a bubble-free, professional finish.

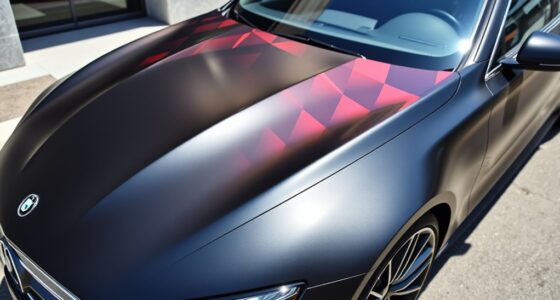
Adding car decals or racing stripes can dramatically enhance your vehicle’s appearance, making it stand out on the road. To achieve a smooth, bubble-free finish, you need to pay close attention to the adhesive types you choose and how you prepare your vehicle’s surface. Different decals come with varying adhesives—some are designed for temporary use, like removable vinyl, while others are more permanent. Make sure to select an adhesive that suits your needs, especially considering the durability you want and the type of surface you’ll be applying it to. High-quality adhesives tend to be more forgiving during application, reducing the chances of trapping air bubbles.
Before applying your decal, surface preparation is critical. You’ll want to thoroughly clean the area where you plan to stick the decal. Use a gentle detergent mixed with water to remove dirt, grease, and wax. Avoid harsh chemicals that could leave residues or damage the paint. Once cleaned, dry the surface completely with a lint-free cloth. Any moisture or debris left behind can prevent the adhesive from sticking properly and cause bubbles or wrinkles. For best results, consider wiping the area with isopropyl alcohol, which helps remove any remaining oils or residues, creating a clean and smooth surface. Proper surface preparation is essential for optimal adhesion and a professional-looking finish.
After preparing the surface, carefully position the decal without removing the backing entirely. Use painter’s tape to secure it in place, so you can examine the alignment and make adjustments. When you’re ready to adhere it, peel back a small portion of the backing at the top or side, and press the decal onto the surface, smoothing it out as you go. Use a soft squeegee or a plastic card to press the decal down firmly, working from the center outward to push out any air bubbles. Keep the pressure consistent and gentle to avoid stretching or damaging the decal.
As you work, take your time to ensure each section is firmly pressed down before moving on. If bubbles appear, don’t panic—use a pin to gently puncture them and press out the air with the squeegee. Proper surface preparation combined with understanding the right adhesive types makes all the difference in creating a clean, professional look. If you follow these steps, your decals or racing stripes will lay smoothly, free of trapped bubbles, and stay looking sharp for years to come. Additionally, selecting a decal with high contrast ratios can help ensure the colors remain vivid and eye-catching over time.
Frequently Asked Questions
Can I Apply Decals on a Matte Finish Car?
Yes, you can apply decals on a matte finish car, but you need to guarantee proper decal adhesion. First, clean the surface thoroughly to remove dirt and oils, then lightly sand the area to improve adhesion. Use a high-quality decal and apply it carefully, smoothing out bubbles as you go. Taking your time will help the decal stick well without damaging the matte finish or trapping bubbles.
What Tools Are Best for Removing Bubbles?
You’ll want a pin or a needle for precise air bubble removal, acting like a tiny sword to pierce bubbles without damaging your decal. A squeegee or a plastic card is essential for decal smoothing techniques, helping you push out bubbles gently. Use a heat gun or hairdryer to soften the decal if needed. These tools make bubble removal faster than a lightning strike, ensuring a smooth, professional finish.
How Long Should Decals Dry Before Driving?
You should wait at least 24 hours before driving after applying decals, allowing the decal drying time to reach the ideal curing duration. This ensures the adhesive fully bonds to your car’s surface, preventing peeling or bubbles. For the best results, avoid washing the vehicle or exposing it to extreme conditions during this period. Patience guarantees your decal stays smooth and secure for the long term.
Will Decals Damage the Car’s Paint?
Your car’s paint is like a delicate canvas, so decals won’t damage it if you prep and apply correctly. Use paint protection products beforehand to safeguard your finish, and choose decals with strong adhesive for better durability. When applied properly, decals won’t harm your paint, and their durability ensures they stay vibrant. Just take your time, follow instructions, and your car stays protected while looking sleek.
Can Decals Be Applied on Curved Surfaces?
Yes, decals can be applied on curved surfaces. You should choose decals with good decal flexibility, which allows them to conform smoothly to the contours of the surface. When applying, work slowly and use a squeegee to press out air bubbles, ensuring the decal adheres evenly without trapping bubbles. Properly flexible decals make curved surface application easier, giving you a sleek, professional look without wrinkles or bubbles.
Conclusion
Now that you know the trick to applying decals smoothly, you’re ready to transform your car’s look without those pesky bubbles. Think of it like painting a masterpiece—patience and gentle pressure are your best tools. With a little practice, your racing stripes will look flawless, turning your vehicle into a sleek, eye-catching work of art. So go ahead, stick with it, and watch your car shine like a trophy on wheels!