
To plan clean switch panel wiring for your off-road build, start by sketching a diagram to visualize the layout and keep wires organized. Route wires away from hot surfaces, moving parts, and water-prone areas, using protected paths. Secure cables with high-quality ties and conduits for durability. Position switches for easy access and consider labeling them for quick identification. By following these steps, you’ll build a safer, more reliable system that’s easy to maintain—continue to explore for more detailed tips.
Key Takeaways
- Draft a detailed wiring diagram to visualize switch connections and layout before installation.
- Choose a centralized, accessible location for the switch panel, ensuring ease of reach and protection.
- Use color-coded wires and labels for quick identification and simplified troubleshooting.
- Secure wires with high-quality clips and conduits, keeping them organized and away from hot or moving parts.
- Test the entire system thoroughly after installation to confirm proper function and secure wiring.
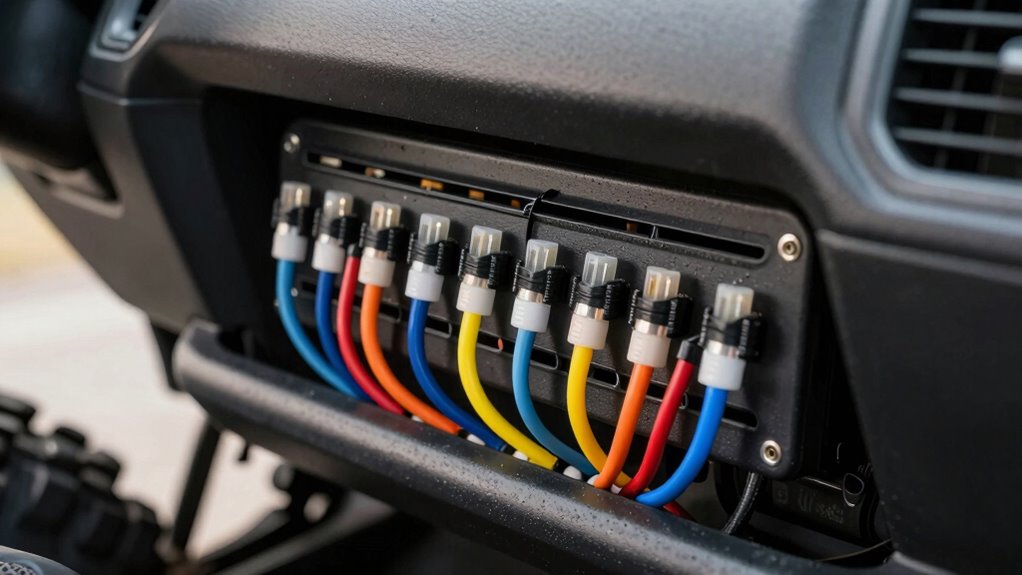
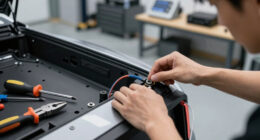
When it comes to off-road builds, a clean and organized switch panel wiring setup isn’t just about aesthetics—it’s essential for safety and ease of maintenance. Proper wire routing ensures that cables stay secure, protected, and free from damage caused by vibrations, debris, or movement. To achieve this, plan your wire routing carefully before starting any connections. Use high-quality cable ties, clamps, or sleeves to keep wires neatly bundled and prevent them from tangling or rubbing against sharp edges. Route wires along existing vehicle panels or frame members whenever possible, keeping them away from hot surfaces, moving parts, or areas prone to water intrusion. Keep your wiring runs short and direct; this minimizes resistance and makes troubleshooting easier later on.
Organized wiring enhances safety, protects components, and simplifies maintenance in off-road builds.
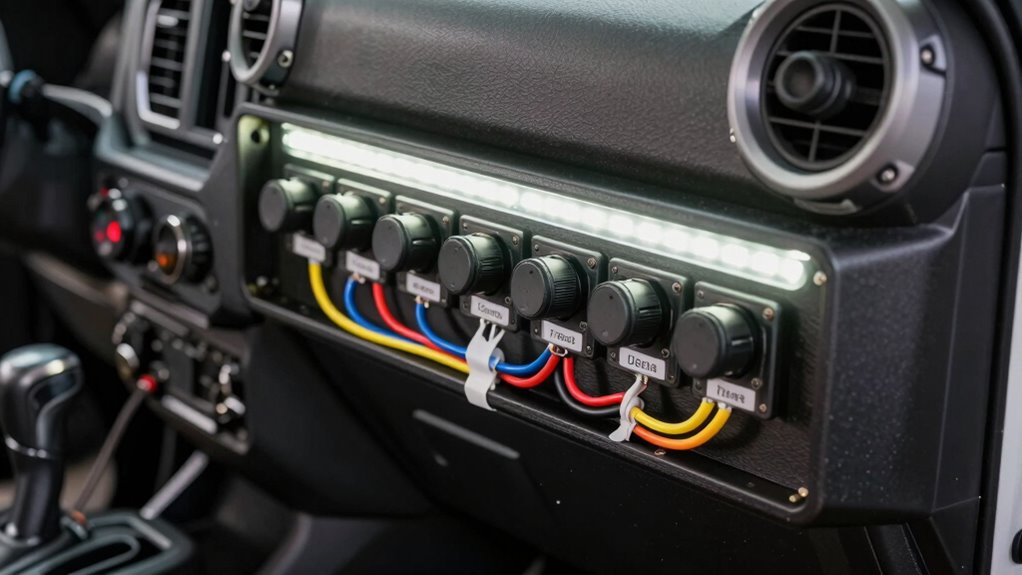
Switch placement is equally critical. You want your switches to be accessible yet protected from accidental activation or damage. Think about how you’ll operate them under off-road conditions—gloves, mud, or water shouldn’t hinder your ability to reach or see the switches clearly. Position switches in a logical order that corresponds with their functions, so you don’t have to hunt for the right toggle in the middle of a trail. Mount switches at a height and angle that make them easy to reach but also secure enough to withstand jolts and vibrations. Consider using switch panels with labels or color coding for quick identification, especially if you have multiple circuits.
A well-thought-out switch placement also simplifies wire routing. When switches are grouped logically, the wiring runs become more straightforward, reducing clutter and confusion. Avoid crossing wires unnecessarily or running them over sharp edges that could cut or damage the insulation. Use protective covers or conduits for wires that pass through exposed areas. When planning your wiring, sketch a diagram to visualize how each wire will connect from the power source to the switch and then to its load. This pre-planning helps identify potential issues early and ensures you have enough wire length without excess slack. Incorporating natural landscape features into your routing can help protect wires from environmental damage and improve overall durability. Additionally, understanding emerging trends in digital publishing can provide insights into innovative tools or techniques for planning and documenting your wiring setup. Paying attention to proper cable management is also vital to maintain a neat and accessible system, especially during future troubleshooting or upgrades. Properly using cable clips and conduits can further enhance the durability and organization of your wiring.
Finally, test your setup as you go. Check that each switch activates the intended component smoothly and that wiring remains secure during vehicle movement. A clean, organized wiring system isn’t just about looks—it’s about creating a safe, reliable, and easily serviceable off-road build. Proper wire routing and switch placement form the backbone of a functional switch panel, making your off-road adventures safer and more enjoyable.

Nilight 16AWG LED Light Bar Wiring Harness Kit 12V On/Off 3 Gang LED Pod Lights Rocker Switch Panel Power Relay Fuse 5Pin Toggle for Cars Boat ATV Trucks-6 Leads
Heavy-duty harness: 16AWG stranded wire, up to 540W load capacity. 180W per circuit, each switch controls a circuit….
As an affiliate, we earn on qualifying purchases.
As an affiliate, we earn on qualifying purchases.
Frequently Asked Questions
What Tools Are Essential for Switch Panel Wiring?
You’ll need essential tools like wire strippers, crimping tools, and a multimeter to guarantee proper wiring. Focus on making secure battery connections and implementing fuse protection to prevent electrical issues. A soldering iron can be handy for solid connections, while zip ties help keep wiring neat. Always double-check your connections with the multimeter to ensure safety and reliability in your off-road build.
How Do I Prevent Electrical Noise in Off-Road Wiring?
Think of your wiring as a river flowing smoothly; to prevent noise, you need sturdy banks. Use proper grounding techniques to create these banks, ensuring noise doesn’t spill over. Incorporate noise filtering components like ferrite beads or capacitors at key points, acting as dams to block interference. This way, your off-road build remains silent and reliable, even over rough terrain.
What Are the Best Wire Gauges for Switch Panel Circuits?
You should use 14 to 16-gauge wire for switch panel circuits, as it offers a good balance of current capacity and flexibility. Make certain your wire insulation is rated for off-road conditions, resisting moisture and abrasion. Proper circuit protection, like fuses or circuit breakers, is essential to prevent damage. Matching the wire gauge to your load and keeping circuits protected helps maintain a safe, clean, and reliable wiring setup for your build.
How Can I Upgrade Wiring for Future Accessory Additions?
Imagine your off-road build as a growing beast craving more power. To upgrade wiring, you should plan for future accessory additions by installing thicker gauge wires for main circuits and dedicated circuits for new gear. Prioritize battery management and circuit protection to prevent overloads. Keep spare terminals and connectors handy, and use modular wiring setups. This way, your setup evolves smoothly without risking electrical chaos.
What Safety Precautions Should I Take During Installation?
During installation, you should prioritize safety by using proper grounding techniques to prevent electrical shorts and guarantee reliable operation. Always insulate wires thoroughly using appropriate insulation methods to avoid accidental contact and short circuits. Wear protective gear, disconnect the battery before working, and double-check connections. Keep your workspace organized and free of debris to prevent accidents. Taking these precautions will help ensure a safe and effective wiring process.

60Pcs Nylon Universal Cable Tie with Buckle Push Mount Zip Tie Mount ChristmasTree Zip Ties Mounts Automotive Cable Ties Wire Clips Fuel Line Ziptie High Temp Heat Resistant Wire Wrap (6-Types)
Package Includes – 60 pieces push mount zip ties (6 types of push mount cable ties, 10 pieces…
As an affiliate, we earn on qualifying purchases.
As an affiliate, we earn on qualifying purchases.
Conclusion
A clean switch panel wiring setup not only keeps your off-road build looking sharp but also guarantees safety and reliability. Did you know that properly organized wiring can reduce troubleshooting time by up to 50%? By planning ahead and using quality components, you’ll enjoy a more efficient, dependable system that’s ready for any adventure. Take the time now to wire smartly — your future self will thank you when you’re out conquering trails, not untangling chaos.

12V Winch Solenoid Relay 200A Continuous 300A Peak Switch for 4×4 Recovery Truck Tail Lift Off-Road Vehicle Wiring Diagram Included
HEAVY DUTY POWER: Handles 200A continuous and 300A peak loads for reliable 12V winch solenoid valve operation during…
As an affiliate, we earn on qualifying purchases.
As an affiliate, we earn on qualifying purchases.

DaierTek 6 Gang Marine Rocker Switch Panel Waterproof 12 Volt, Boat Toggle Switch Panel 12V Blue LED Lighted for Boat Car RV UTV with USB Cigarette Lighter Socket Voltmeter
Dual LED Marine Switch: The marine switch of the 6 gang rocker switch panel is dual led marine…
As an affiliate, we earn on qualifying purchases.
As an affiliate, we earn on qualifying purchases.